To speed up your computer, browse and delete all the unnecessary files and folders. Use an antivirus app to scan through the data for any viruses and malware. Additionally, clear all the cache present in the registry.
Working with a slow and laggy computer can be cumbersome, especially during hectic times!
The substandard speed of your PC can be attributed to several root causes, be it stuffed disk space, outdated drivers, neglected system updates, or excessive irrelevant files.
Follow this article to find some reliable and effective techniques that have always proved useful to expedite a PC. Keep reading to learn how to speed up your PC really quickly.
Are you wondering how to speed up my computer lightning fast?
These quick measures will help you speed up your computer when you’re short on time. Comply with the below actions to relieve your PC and boost its speed.
Opening multiple tabs and windows at once can take a toll on the computer’s processing power. The ideal number of windows you should open at once is 3. Even while using Google Chrome or any other browser, you should not have more than 8 tabs open at once. This doesn’t only increase per-second data usage but also RAM usage.
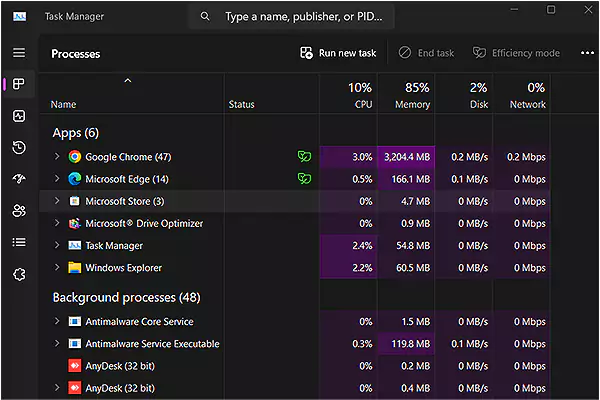
Anything above this can slow down your PC. You can take the help of the pre-installed Task Manager to clean up your task panel.
Quick Tip
Here are some commonly used shortcut keys to open Task Manager:
- Ctrl + Shift + Esc
- Ctrl + Alt + Del
- Win + X
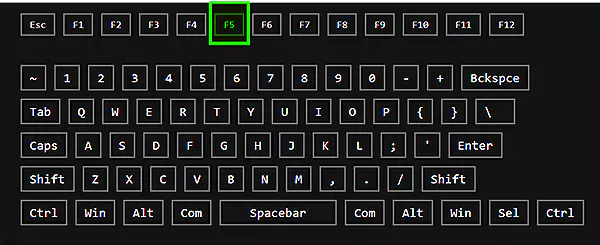
Quite often, simply refreshing your PC a few times does the trick! For Windows users, the simplest way to do this is by pressing ‘Ctrl + R’ or ‘F5’ on your keyboard. The latest keyboards have an ‘F5 key instead of Fn (Function key) + F5’ so if you have the latest keyboard, simply press F5.
If you’re a Mac user, you can do the same using ‘Cmd + R’. Alternatively, press ‘Cmd + Shift + R’ or ‘Cmd + Option + R’ to refresh your webpage.
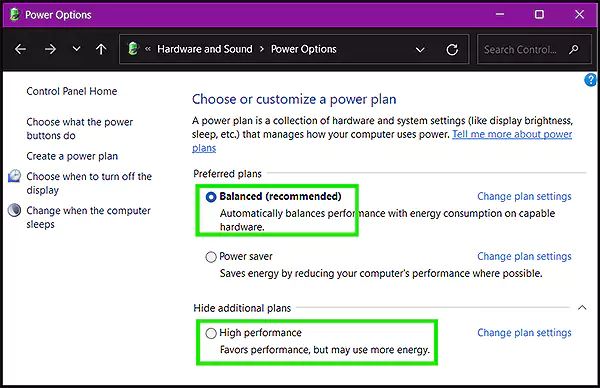
Every PC, desktop, or laptop has a specific Power Saver plan that cuts on energy usage along with performance. Opting for the strongest power saver plan will prominently slow down your PC. For an instant boost, go for the ‘Balanced’ or ‘Higher Performance’ option.
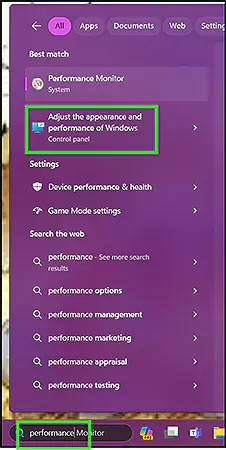
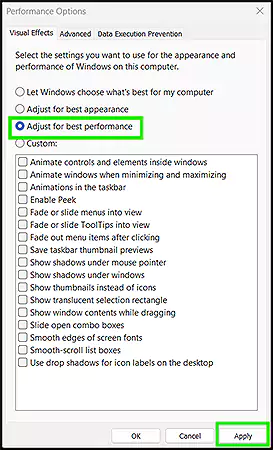
Live wallpapers and showy animations, although appealing, often crowd the task panel right from startup. Apply a theme that uses fewer resources, leaving space for more activities to take place.
To adjust the visual effects on Windows:
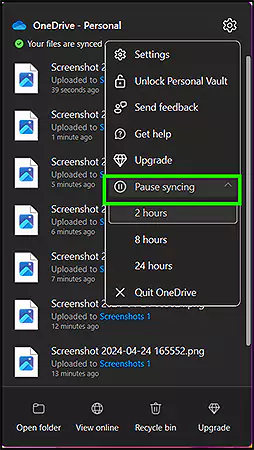
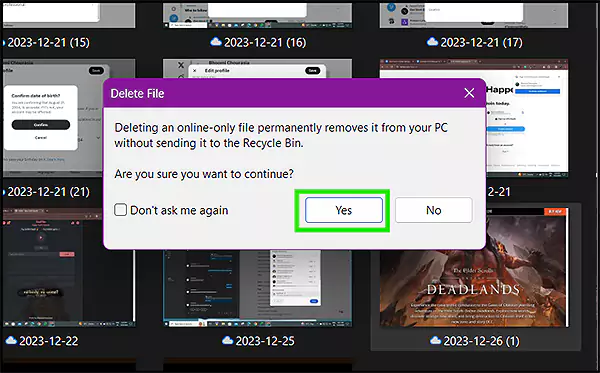
In case, you have recently downloaded or transferred several files, they’ll automatically start uploading on the cloud. Pausing this can relieve a burden on the computer’s processing power. To do this, follow through the below steps:
Scripted viruses usually intend to damage or steal your data, not speed. However, certain viruses, like Spacefiller, fill up the disk space by anonymously multiplying themselves. Use antivirus software to scan your PC for such viruses and malware. If found, take the actions recommended by the application instantly.
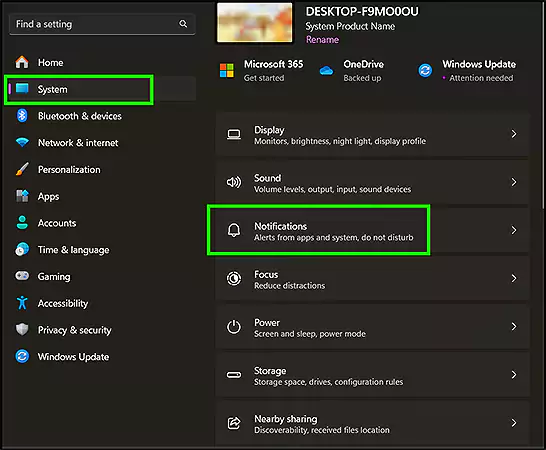
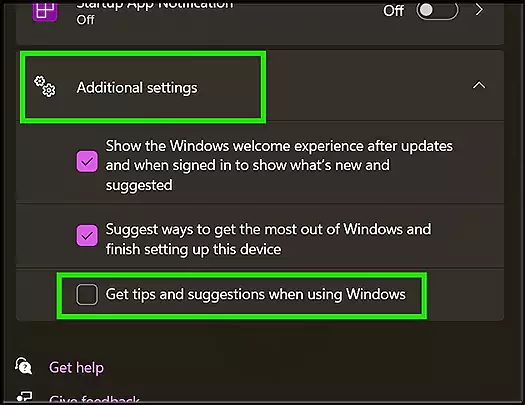
Windows 10 users often find several tips appearing on their screen as per Windows’ recommendations. From personal experience, I haven’t ever found them of much worth. With them being mostly useless, they clog the task pan unnecessarily.
To turn them off, comply with the below steps:
Some PCs have a slower processor from the start. For those, even a regular feature of ‘Search indexing’ can be memory-consuming. If that’s the case, turn it off using the following steps:
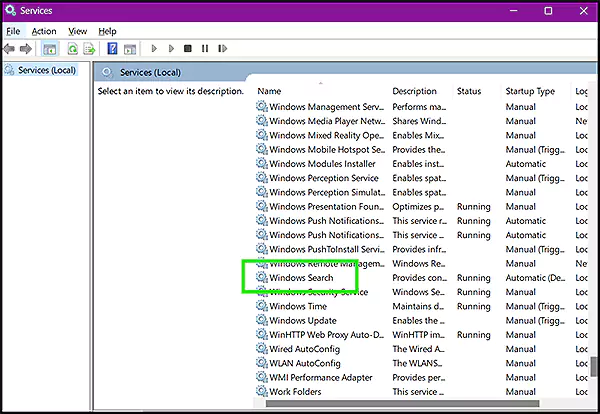
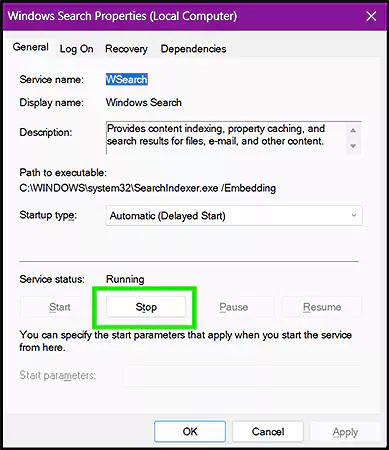
If all the files on your drive are already indexed, you won’t notice much change the next time you search for a file.
Following these tricks, you will notice a boost in your PC’s performance. But, before your PC speed betrays you during an urgent task, let’s get to the depths of the issue.
There can be moments when your PC can ditch you in urgent situations. To prevent that, take your time to complete the below-mentioned processes.
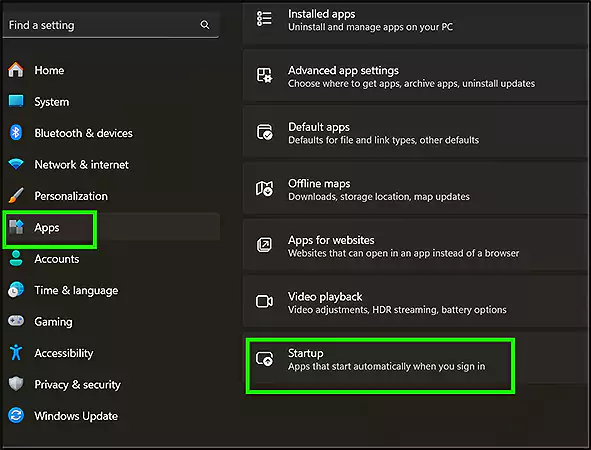
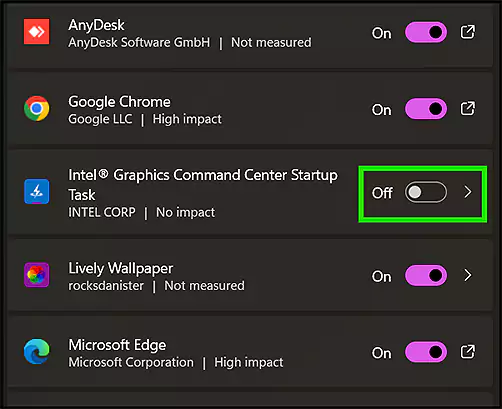
Auto-launch programs are those that automatically start the moment you boot up your PC. They can either be designed or permitted to do so. However, having a lot of programs on auto-launch can be hectic, even for a PC.
Recheck the permitted applications to turn off unnecessary startups. You can do this by following the below steps:
Another thing that’s affecting both the primary and secondary memory, along with the speed, is unnecessary files. It’s about time you deep clean your PC in the following ways:

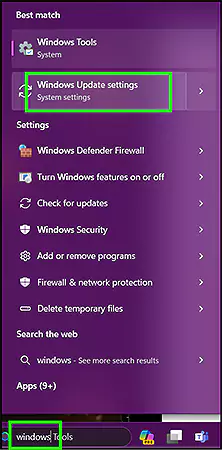
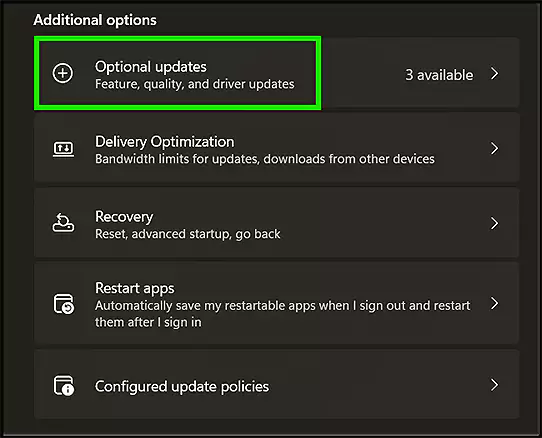
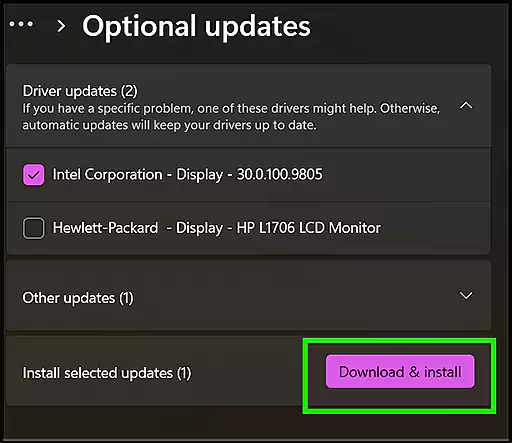
Every OS releases an update once in a while to fix bugs and issues. These updates, if neglected, can prevent the performance boost in your PC. Check for any updates using the below steps:
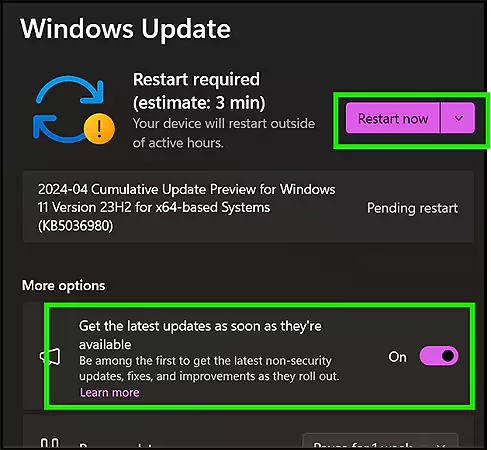
Optionally, you can choose to get notified of the latest updates by toggling the option.
Drivers are those programs that let any connected hardware function on the OS. To update them, follow the below steps:

Most of the stuff you save on a PC is automatically uploaded to your cloud. While it’s regular and sometimes ‘unnecessary’ syncing might put you off at times, you can utilize it for good.
As everything’s backed up, you can easily remove rarely used items and extra large files from your drive. This will save additional memory for other activities, indirectly speeding up your computer.
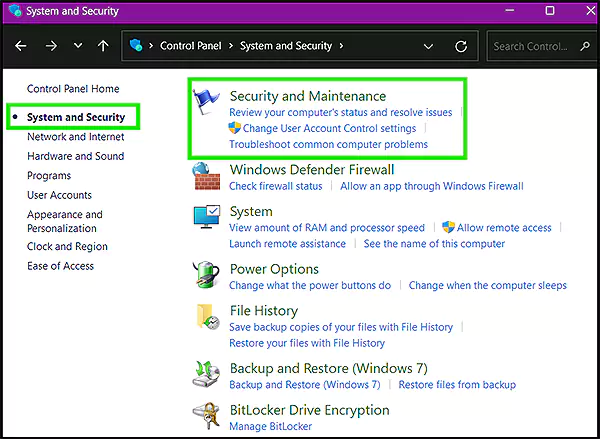
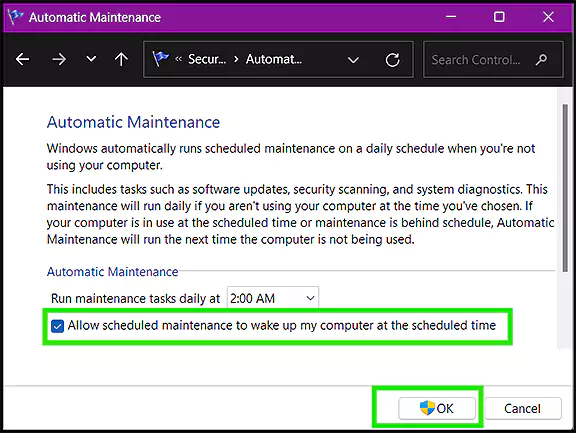
Windows performs daily maintenance on your PC, including security scanning and system diagnostics, to ensure peak performance. By default, it runs at 2:00 a.m., but it often gets accidentally turned off. Here are the steps to turn it on:-
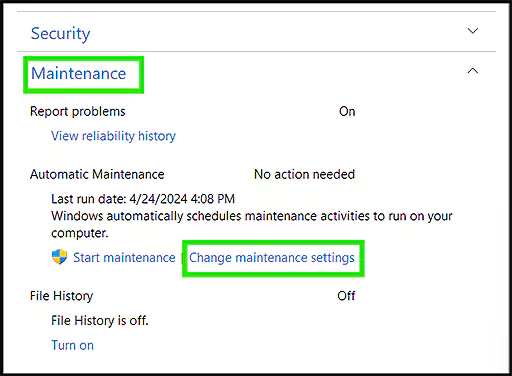
Alternatively, you can tap the ‘Start Maintenance’ button to start the process immediately. This option can be used every time you want to run it manually.
All the above-mentioned techniques can be easily done through your PC’s settings. However, if you’re not yet satisfied with the speed of your computer, you can opt for some external options.
The desperate times call for desperate measures. Here are a few actions you can take before finally deciding on going for a repair or replacement.
RAM plays a prominent role in deciding how many tasks your computer can perform at once. The more RAM, the more diversity and speed your PC will have. It may be possible your current RAM size is not able to keep up with your workload. For that, check your device’s specifications and purchase supported RAM sticks.
To install these sticks manually, follow the below process.
Safety Precautions Ensure to take the below actions for the safety of you and the components:Touch any unpainted metal surface to discharge status electricity without harming the memory module.Hold the modules from the top or the edges without coming in contact with the gold pins (chips).
Another fix is upgrading your hard drive to a bigger size for more space. You can also opt to install an external HDD (Hard Disk Drive) or a brand-new SSD (Solid State Drive).
Unlike RAM, an HDD upgrade does not increase performance or speed up the computer directly. However, more storage does make things easier for the RAM while managing multiple tasks in the long run. Plus, if you choose to add an SSD, you will get a solid boost, as SSDs are generally faster than HDDs.
A case of mine was when a recent change slowed down my computer. If that is the case with you, the best option is to restore your PC from a system restore point. However, that’s only possible if system protection was turned on earlier.
Quick Definition System Restore Point can be called as the backup of an OS, with all its system settings, at a certain point in time. It can reverse the changes made in the last 7-14 days.
To restore your PC from a restore point, follow the below steps:

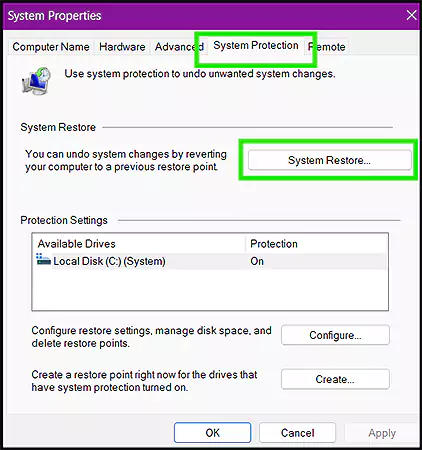
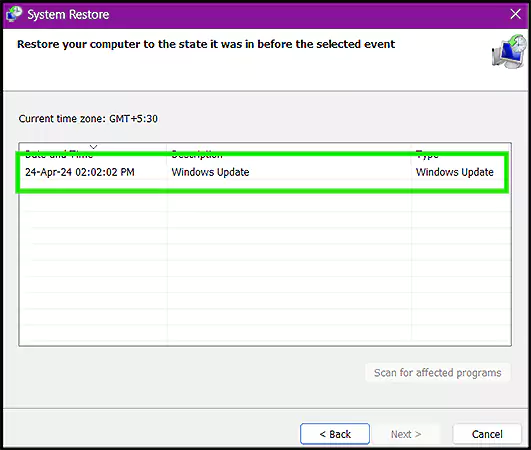
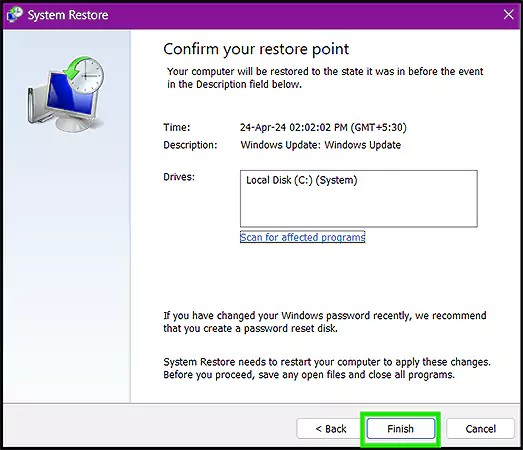
Remember that restoring your system doesn’t affect any personal files, but it will remove all the apps and updates installed after the restore point.
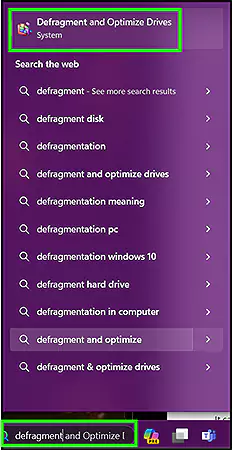
Windows owners should consider defragmenting their hard drive, especially if it has been in use for a long time. However, remember to never defragment an SSD, as it causes unnecessary wear and tear, reducing its lifespan.
To defragment your HDD, follow the below steps:
It can take a few minutes to a few hours, depending on the HDD size. Before starting with the process, back up your data and transfer the OS file to the SSD.
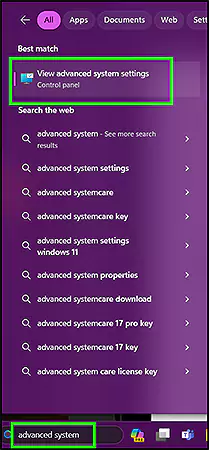
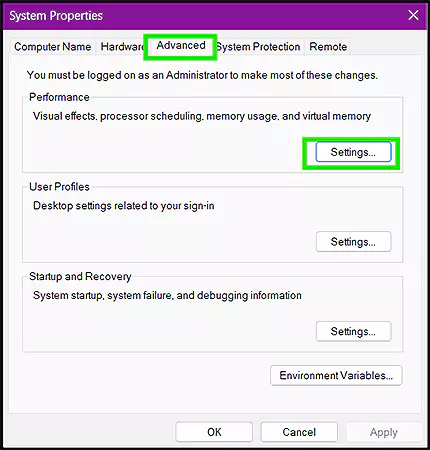
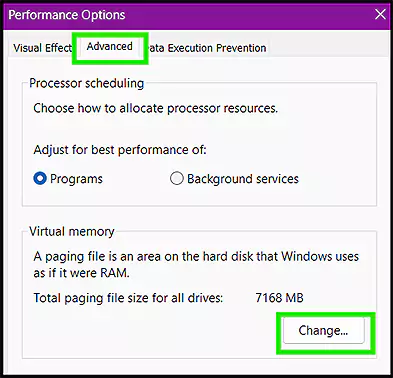
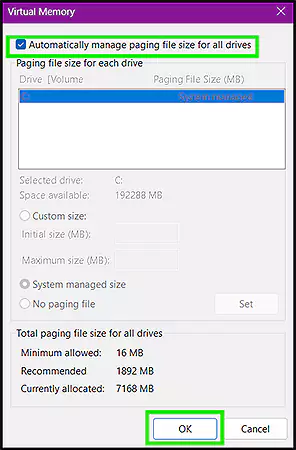
A paging file is a portion of the hard disk reserved by the OS for times when data exceeds the physical memory (RAM). Windows 11 users will notice a feature to automatically manage the page file size, enhancing the efficiency of your computer.
To ensure this setting is turned on, comply with the below steps:
The disk caching speed of an HDD is usually lower than that of an SSD. However, ReadyBoost, a Windows feature, can accelerate your HDD caching by using a USB as an alternative.
To take advantage of this option, take the following actions:

If you see a note saying: ‘This device cannot be used for ReadyBoost’, your USB isn’t eligible for the feature. For maximum results, use a flash drive that is double the size of your PC’s RAM. Plus, the faster the USB is, the more speed you will gain.
Now that everything’s done, it is a must to keep your PC at its peak level of performance. To ensure that it doesn’t lose its speed in the future, follow the below-mentioned tips regularly:
Write these down on your schedule or set a reminder on your phone. Either way, these practices should be performed on a regular basis to keep your PC in its best state. Otherwise, a slight lack of attention may bring back the lagging issue of your computer!
To speed up your computer, browse and delete all the unnecessary files and folders. Use an antivirus app to scan through the data for any viruses and malware. Additionally, clear all the cache present in the registry.
To put it briefly, you can speed up your computer momentarily by doing a factory reset, but there’s no assurance that this speed will last. With continued operation, a computer may occasionally revert to its sluggish condition.
Press Ctrl + Alt + Delete on your keyboard to open Task Manager. Here, you can view all applications working at this moment, together with their CPU and memory usage.